Template Types and Syntax
Template Types
Mobee supports two types of templates:
Simple Document Template
When the checkbox Combined Document is not checked, the template is designed for unitary generation. This means that the template includes information for one only. For instance, if you create a simple template for the "Contact" object, it will incorporate the information of one contact and its related data.
Combined Document Template
When the checkbox Combined Document is checked, it indicates that the template will be generated for multiple records simultaneously. This template employs a special syntax to loop through a list of records. To access fields on each record in a combined document, your template should start by looping through the list of items using the following tag {#items}{/}. Check the loops section for more details.
Syntax
The syntax of tags used in Mobee Templates is inspired by the language-agnostic Mustache specification.
- Normal tags start with an alphabetical character.
- Other types of tags start with special prefixes.
For example:
- Accessing merge fields on the object:
{Salutation} {firstName} {lastName} - Accessing related lists data:
{#cases}and{/}to start and close a tag. Check the loops section for more details. - Inserting dynamic images:
{%ImageUrl__c}will add the image for the field "ImageUrl__c". Check the Dynamic images section for more details.
For example, to access the "Contact" data using the given syntax in your template:
Hello {Salutation} {FirstName} {LastName}!
Output:
Hello Mr. John Doe!
Conditions
Conditions start with the # character and end with a slash. For instance, {#Salutation == "Mr."} starts a condition and {/} ends it.
Note: To verify checkbox fields (true or false), use the following syntax:
The contact {Name} {#HasOptedOutOfEmail == 1}has{/}{#HasOptedOutOfEmail == 0}hasn’t{/} opted out of emails.
Output:
The contact Mr. John Doe has opted out of emails.
Logical expressions
You can use the following operators for more complex logical expressions:
- AND
a && b - OR
a || b - ADDITION
a + b - SUBTRACTION
a - b - MULTIPLICATION
a * b - MODULO
a % b - DIVISION
a / b - TERNARY
a ? b : c - ASSIGNMENT
a = 1 - EQUALITY/INEQUALITY
a == 1, a != 1 - RELATIONAL
a > 1, a < 1, a >= 1, a <= 1 - OPERATOR PRECEDENCE with parentheses
(a && b) || c - EXPONENTIAL NOTATION:
12e3=> returns12000
Example:
{#products.length > 1}There are multiple products{/}
{#firstName == "John"}Hello John{/}
The first condition will display the section only if there are 2 or more products.
The second condition will display the section only if the username is the string "John".
Output:
There are multiple products
Hello John
Loops
As mentioned earlier, we start looping through a list of data with the "#" symbol. Example:
{#Cases}
{CaseNumber}: {Description}.
{/}
Output:
00001299: Need Access Permission to visit location.
00001624: Support Client.
00001836: The cable of the battery charger is missing.
Note: Each merge field used in the loop section refers to the fields of the current related object. If the field is not found on the related object, the engine will reference it from the parent object.
Dynamic Images
Dynamic images can be seamlessly integrated into your generated documents through the utilization of dynamic placeholders. For example, if you possess a field named ProfilePicture__c housing the URL of an image or the image encoded as a Base64 string, it can be incorporated into your document effortlessly using the designated tag: {%ProfilePicture__c} (starting with the % symbol).
Base64 Images
To include an image using base64 data, simply encode the image into Base64 format and store it directly in your salesforce field.
URL Images
To incorporate an image using a URL, adhere to the following procedural steps:
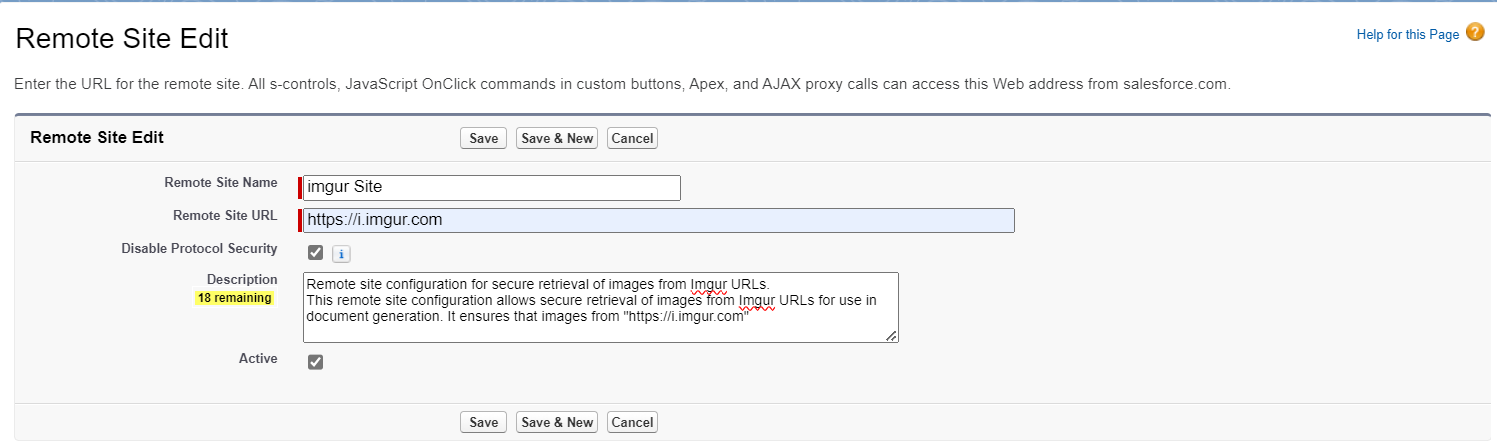
- Navigate to "Setup" within Salesforce.
- In the quick find box, locate and select "Remote Site Settings."
- Click the "New Remote Site" button.
- Assign a name for the site (e.g., "Imgur Site").
- In the "Remote Site URL" field, input the base URL of the image's location—such as "https://i.imgur.com."
- Enable the "Disable Protocol Security" checkbox to permit retrieval over HTTP.
- Select "Save" to preserve the changes.
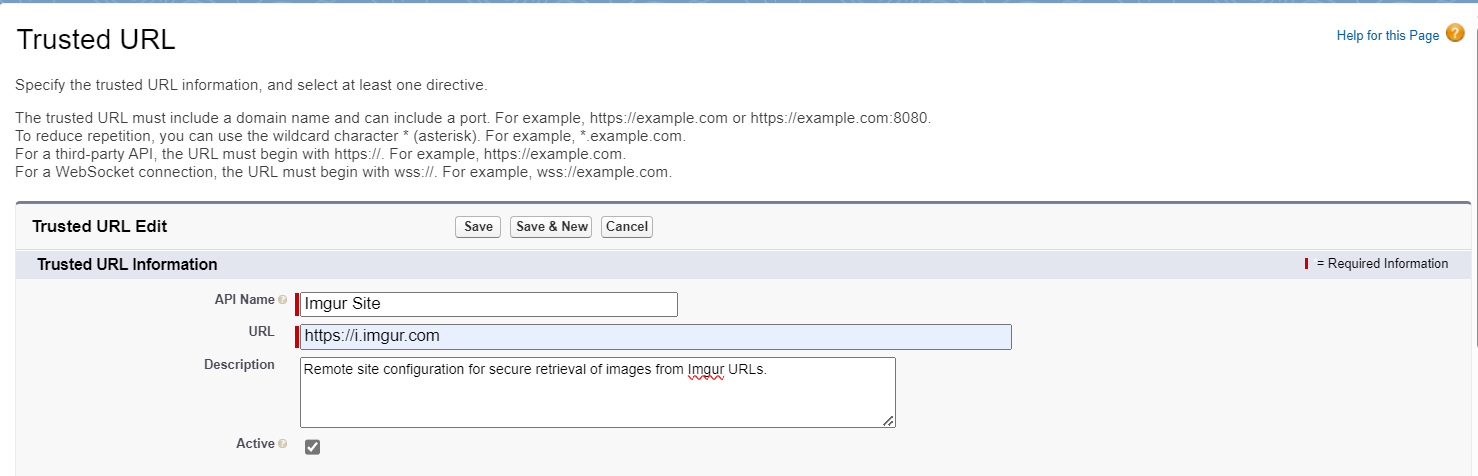
Proceed with the following steps to incorporate the URL into the trusted URLs with all Content Security Policy (CSP) directives enabled:
- In the setup page, locate "Trusted URLs" using the quick find box.
- Select the "New Trusted Site" button.
- Assign a name for the trusted site (e.g., "Imgur Trusted").
- In the "Site URL" field, input the same base URL as before, namely "https://i.imgur.com."
- Enable all CSP directives: "Connect," "Font," "Img," "Media," "Object," "Script," "Style."
- Confirm the changes by clicking "Save."
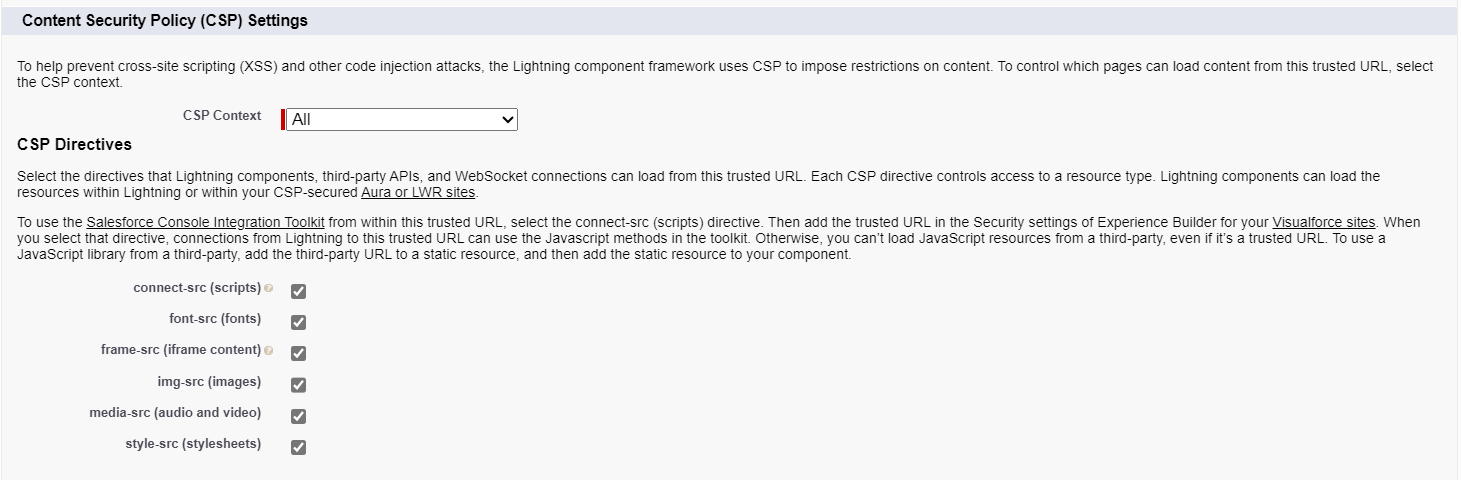
You have now set up remote site settings and trusted URLs to securely retrieve the image over HTTP. You can then use the {% ProfilePicture__c} tag to dynamically include the image in your generated documents.
Filters
With filters, it is possible to manipulate any given data field. Mobee suggest multiple filters designed to format, manipulate, and customize dynamic content within document templates. These filters help users format dates, change text case, and generate tailored content.
Usage Example
Scenario: A user is generating a contract document that includes custom date formatting and dynamically formatted names. The system should return dates in different formats and convert names to uppercase or lowercase as required.
Template:
Hello {Salutation} {FirstName} {LastName | upper}!
Today's date is {docUtils.today | formatDate: '[["year": "numeric", "month": "long", "day": "numeric"]]'}.
The contract start date is {StartDate | shortDate}.
Next year, this date will be {StartDate | followingYear}.
Sample Input Data:
| Field | Value |
|---|---|
| Salutation | Mr. |
| FirstName | John |
| LastName | Doe |
| StartDate | 2022-01-21 |
Expected Output:
Hello Mr. John DOE!
Today's date is January 21, 2022.
The contract start date is 21/01/2022.
Next year, this date will be 2023.
String Filters
lower: Converts text to lowercase.Example:
{"Hello World" | lower}Output:
hello worldupper: Converts text to uppercase.Example:
{"hello world" | upper}Output:
HELLO WORLD
Date Filters
shortDate: Formats the date in a concise format.Example:
{StartDate | shortDate}Output:
21/01/2022followingMonth: Returns the next month from the given date.Example:
{StartDate | followingMonth: '[["year": "numeric", "month": "long"]]'}Output:
February 2022followingYear: Returns the year after the given date.Example:
{StartDate | followingYear: '[["year": "numeric"]]'}Output:
2023lastWorkingDayOfMonth: Returns the last working day of the month for the given date.Example:
{StartDate | lastWorkingDayOfMonth}Output:
31/01/2022formatDate: Formats the date based on the specified options.Example:
{StartDate | formatDate: '[["year": "numeric", "month": "short", "day": "2-digit"]]'}Output:
21 Jan 2022
Formatting Options for Date Filters
The date filters (followingMonth, followingYear, lastWorkingDayOfMonth, and formatDate) support customizable formatting using the following options:
[[
  "weekday": "narrow" | "short" | "long",
  "era": "narrow" | "short" | "long",
  "year": "numeric" | "2-digit",
  "month": "numeric" | "2-digit" | "narrow" | "short" | "long",
  "day": "numeric" | "2-digit",
  "hour": "numeric" | "2-digit",
  "minute": "numeric" | "2-digit",
  "second": "numeric" | "2-digit",
  "timeZoneName": "short" | "long",
  "timeZone": "Asia/Shanghai",
  "hour12": true | false,
  "hourCycle": "h11" | "h12" | "h23" | "h24",
  "formatMatcher": "basic" | "best fit"
]]
This flexibility ensures users can easily tailor date formats to their specific needs, making documents accurate and localized for diverse audiences.
Number Filters
currency Function
The currency function is designed to format numeric values as currencies, making it easy to present financial data in documents. By specifying a 3-letter currency ISO code, the function formats the input number and appends the corresponding currency symbol based on the locale of the document template.
To handle dynamic currency requirements, such as using the currency associated with the current record (e.g., an invoice or account), the function allows you to pass dynamic values like $record.CurrencyIsoCode.
Returns The function returns a formatted string representing the number as a currency, including:
- The appropriate currency symbol.
- Number formatting (thousands separators and decimal points) based on the document's locale.
Usage Example
Scenario: A company generates invoices in multiple currencies depending on the country of the customer. The currency symbol should dynamically adjust based on the specific invoice’s currency, ensuring proper presentation of financial data.
Template:
Account’s Annual Revenue: { Account.AnnualRevenue | currency: '$record.Account.CurrencyIsoCode'}
Invoice Amount: {Amount | currency: '$record.CurrencyIsoCode'}
Sample Input Data:
{
  "Account": {
    "AnnualRevenue": 13000000,
    "CurrencyIsoCode": "USD"
  },
  "Amount": 15123,
  "CurrencyIsoCode": "JPY"
}
Expected Output:
Account’s Annual Revenue: $13,000,000.00
Invoice Amount: ¥15,123
The currency function simplifies the presentation of monetary values by dynamically adapting to various currencies, making documents more user-friendly and suitable for international audiences.
List Filters
groupBy Function Documentation
The groupBy function organizes elements in a collection by grouping them based on specified keys. Multiple levels of grouping can be achieved by providing multiple keys, separated by semicolons. The grouping order follows the sequence of the specified keys.
Returns
The function returns an object containing the following properties:
$groupedKey#: Represents the grouping key at each level, where#denotes the grouping level, starting from 1.$groupedItems#: Contains the items associated with each grouping key. When multiple levels of grouping are applied, each level contains its own$groupedKey#and$groupedItems#, incrementing the index for each deeper level.
Usage Example
Scenario:
Grouping invoice items by Category and Subcategory.
Template:
Invoice Number: {InvoiceNumber}

{#InvoiceItems | groupBy: 'Category;Subcategory'}
- Category: {$groupedKey1}
  {#$groupedItems1}
  - Subcategory: {$groupedKey2}
    {#$groupedItems2}
    - Item: {ItemName}
      Quantity: {Quantity}
      Price: {Price | currency: 'USD'}
    {/}
  {/}
{/}
Sample Data (Table Format):
| Category | Subcategory | Item Name | Quantity | Price |
|---|---|---|---|---|
| Electronics | Laptops | Dell XPS 13 | 2 | 1200 |
| Electronics | Laptops | MacBook Pro | 1 | 2000 |
| Electronics | Phones | iPhone 14 | 3 | 999 |
| Furniture | Chairs | Office Chair | 5 | 150 |
Sample Data (JSON Format):
{
  "InvoiceNumber": "INV-2024-001",
  "InvoiceItems": [
    {
      "Category": "Electronics",
      "Subcategory": "Laptops",
      "ItemName": "Dell XPS 13",
      "Quantity": 2,
      "Price": 1200
    },
    {
      "Category": "Electronics",
      "Subcategory": "Laptops",
      "ItemName": "MacBook Pro",
      "Quantity": 1,
      "Price": 2000
    },
    {
      "Category": "Electronics",
      "Subcategory": "Phones",
      "ItemName": "iPhone 14",
      "Quantity": 3,
      "Price": 999
    },
    {
      "Category": "Furniture",
      "Subcategory": "Chairs",
      "ItemName": "Office Chair",
      "Quantity": 5,
      "Price": 150
    }
  ]
}
Expected Output:
Invoice Number: INV-2024-001
Category: Electronics
- Subcategory: Laptops
- Item: Dell XPS 13 Quantity: 2 Price: $1,200.00
- Item: MacBook Pro Quantity: 1 Price: $2,000.00
- Subcategory: Phones
- Item: iPhone 14 Quantity: 3 Price: $999.00
- Subcategory: Laptops
Category: Furniture
- Subcategory: Chairs
- Item: Office Chair Quantity: 5 Price: $150.00
- Subcategory: Chairs
This example illustrates how the groupBy function can be used to organize data effectively based on hierarchical categories.
sortBy Function
The sortBy function helps you arrange items in a list based on specific fields, such as sorting by category and price.
Example
Template:
{#InvoiceItems | sortBy: 'Category;Price'}
- {ItemName}: {Price}
{/}
Expected Output:
- Office Chair: 150
- Dell XPS 13: 1200
- MacBook Pro: 2000
htmlList Function
The htmlList function turns an HTML string into a simple list.
Example
Template:
{richTextField: htmlList}
Data
{richTextField: '<ul><li>Item 1</li><li>Item 2</li></ul>'}
Expected Output:
- Item 1
- Item 2
multiPicklist Function
The multiPicklist function converts a string into a list using specific options, such as a separator and bullet symbol.
Example
Data
{fruits: 'Apple;Orange;Banana'}
Template:
{fruits | multiPicklist: '[["separator": ";", "bulletSymbol": "-" ]]'}
Expected Output:
- Apple
- Orange
- Banana
where Function
The where function helps you filter items that match specific conditions, such as selecting only electronic items.
Example
Template:
{#InvoiceItems | where: 'Category=="Electronics"'}
- {ItemName}
{/}
Expected Output:
- Dell XPS 13
- MacBook Pro
- iPhone 14
sum Function
The sum function allows you to calculate the total of values within a specific field in a list. The result of this calculation can be accessed using the $result placeholder. Like other placeholders, you can apply various number filters to it like the currency.
Example
Template:
{#Opportunities | sum: 'Amount'}{$result | currency: 'EUR'}{/}
Expected Output:
15 123,00 €
product Function
The product function allows you to calculate the product (multiplication) of values within a specific field in a list. The result of this calculation can be accessed using the $result placeholder. Like other placeholders, you can apply various number filters to it.
Example
Template:
{#Items | product: 'Value'}{$result | formatNumber: '[["maximumSignificantDigits": 3]]'}{/}
Expected Output:
123.000